On completion of this stage you should be familiar with the following concepts:
|
Modeling techniques: |
Controlling the columns appearing in a display |
|
Useful display templates: |
Table, Number Display, Text Display |
We shall now begin modeling the issuing of Purchase Orders (POs) by purchasers. We shall start with the display of a tabular list of requisitions approved by managers. This table will differ from previously modeled tables – we will specify which columns to display and in which order, instead of relying on defaults.
In the subsequent stages we shall add:
An alert, displayed if any of the requisitions are marked as urgent, to prompt the purchaser to process them.
A list of issued POs for the currently selected requisition.
An Order button to issue a purchase order to a supplier for the currently selected requisition.
After issuing a purchase order, the requisition is marked as (partially or fully) ordered.
This stage’s modeling should be performed in the Tutorial 10-11 project, you imported at the end of the previous stage.
We start by adding a new view:
Zoom to Purchaser
Add Display/View. Name it Issue Purchase Orders.
Up to this point in the tutorial, whenever we wanted to display a tabular list of data, we used the Simple Table template. The advantage of using this template is that it is very quick to model. The disadvantage is that you have no control over which columns are displayed, and at what order. There is also additional functionality we will require in upcoming stages which cannot be implemented using a Simple Table, but rather using the Table template:
Zoom to Issue Purchase Orders.
Add a Display/Table
template (![]() ).
Name it Approved Requisitions List. Zoom into it.
).
Name it Approved Requisitions List. Zoom into it.
The Purchaser model should look similar to the following:
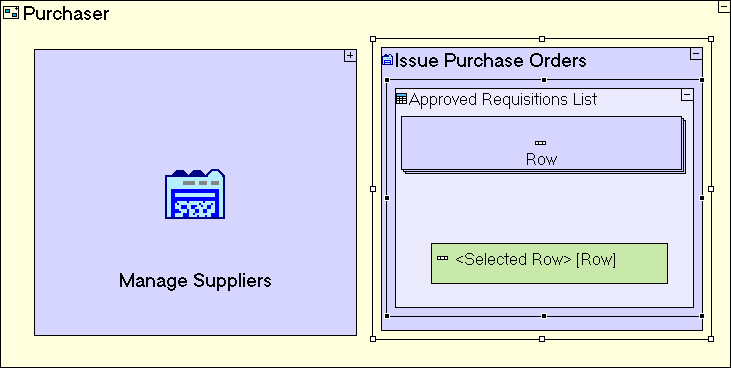
The Table template comes pre-configured with a Row display element and a <Selected Row> display data element (of the Row) display, which will be used in subsequent steps to design and control the table display.
Define the columns, by inserting Text/Number/Date Display templates into the row, each defining a cell in the row.
The name given to each element in the row will be used as the column heading, when the table is displayed:
Add a Display/Number
Display (![]() ).
Name it Id.
).
Name it Id.
Add a Display/Text
Display (![]() ).
Name it Description.
).
Name it Description.
Add a Display/Date
Display (![]() ).
Name it Date.
).
Name it Date.
Add a Display/Text
Display (![]() ).
Name it Urgency.
).
Name it Urgency.
The Approved Requisitions List table model should look similar to the following:
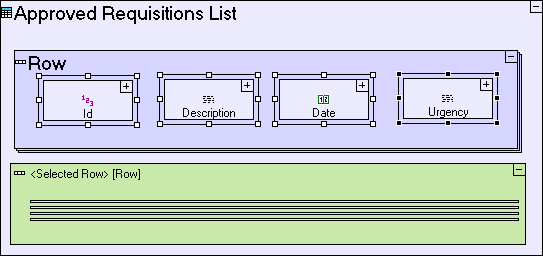
The Number/Text/Date Display
templates are similar to the Text Area input field we’ve
previously used: each contains a <Value> element, which
holds its value and serves as the source/target of flows which
involve this value.
The difference is in the user
interface aspects of the two: An input field provides the user with
the ability to change the value, whereas a display does not.
The flexibility of using the Table template now comes into play. We control which fields from the database are displayed (Status in this case is not displayed), Also, we can explicitly define the order by which columns are displayed.
As with the Simple Table, we should create a process that populates the table with values from the database:
Zoom out to Issue Purchase Orders view.
Add a Basic/Action. Name it Populate Approved Requisitions List.
The Issue Purchase Orders view model should look similar to the following:
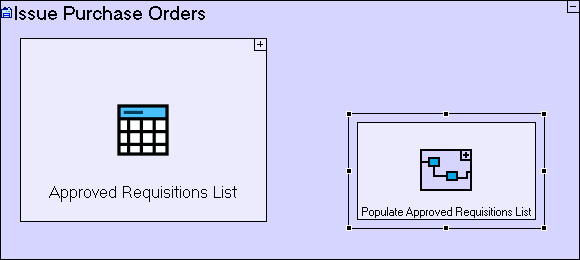
As we have done in previous cases, the Populate… process will have a Generate… process which creates a display data element representing the table and outputs it to an ancestor reference of the display:
Zoom into Populate Approved Requisitions List.
Add Basic/Action. Name it Generate Approved Requisitions List. Add an exit to it.
Add an ancestor reference of the Issue Purchase Orders view.
Create a flow linking the exit of Generate Approved Requisitions List to the Issue Purchase Orders/Approved Requisitions List table.
The Populate Approved Requisitions List view model should look similar to the following:
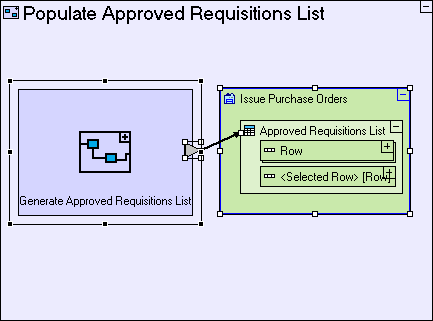
The Generate Approved Requisitions List process retrieves all requisitions which have been approved:
Zoom into Generate Approved Requisitions List.
Add a Database/Find. Add a trigger to it. Name the trigger Status.
Reuse the “Approved” constant (used in Manager system/Requisition Approval view/Approve Requisition button). Create a flow linking it to Find/Status.
Drag Approved Requisitions List table from the repository/outline. Create flow from it to the Generate Approved Requisitions List exit.
The Generate Approved Requisitions List view model should look similar to the following:
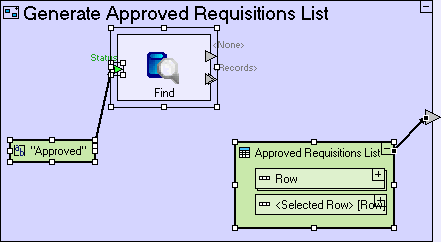
Up to this point, the Generate Approved Requisitions List process, is similar to other Generate... processes we modeled. From this point on, the modeling changes. As the table will not accept the records found directly, we must create a process that converts (or maps) the fields of the Requisition database record to a Row display data element in the table:
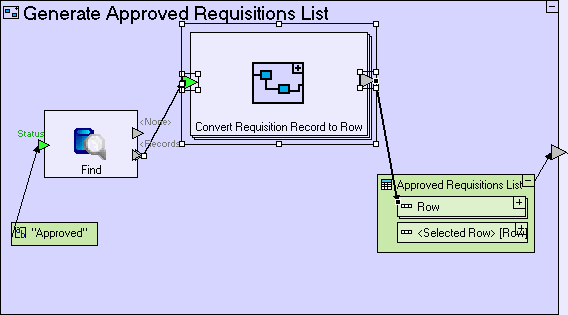
Add a Basic/Action. Name it Convert Requisition Record to Row. Set it repetitive. Add a trigger and exit.
Create a flow linking Find/<Records> to Convert Requisition Record to Row/Record.
Create a flow linking the Convert Requisition Record to Row/Row exit to Approved Requisitions List/Row.
The Generate Approved Requisitions List view model should look similar to the following:
And model the mapping from Requisition to Row:
Zoom into Convert Requisition Record to Row.
Drag a Requisition databased record from the repository/outline (it's reused in various locations such as Open Requisitions view/Requisition List table). Create a flow linking the process trigger to it.
Drag a Row from the repository/outline (this is the row in Approved Requisitions List table). Create a flow linking it to the process exit.
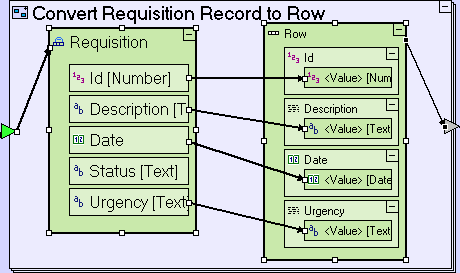
Create the following flows:
Requisition/Id to Requisition Row/Id/<Value>
Requisition/Description to Requisition Row/Description/<Value>
Requisition/Date to Requisition Row/Date/<Value>
Requisition/Urgency to Requisition Row/Urgency/<Value>
The Convert Requisition Record to Row model should look similar to the following:
Save your work, and view the application in the browser.
Click on the Purchaser perspective tab.
Switch to the Issue Purchase Orders view.
You should see a list of (approved) requisitions, similar to the following:
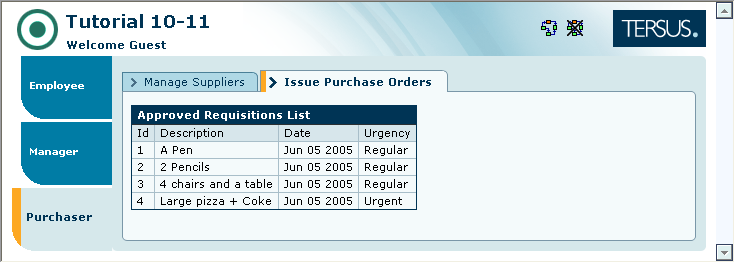
Note that the requisition list displayed is different from previously modeled requisition lists, specifically the absence of the Status column. In the subsequent stages we will utilize additional features of the Table display, such as the ability to display computed values, and the ability to perform an action when a row is selected.
Import the sample project Tutorial 11-12 and use it as the basis for the next stage of the tutorial.
For a reminder on how to import a sample project, see the Importing a Sample Project section at the end of Stage 2.
This sample project contains all the functionality modeled thus far.
You may now proceed to Stage 12, in which we will learn how to perform actions conditionally.
Click here to open the live project in a separate window.